Project 02: Alternative Controller
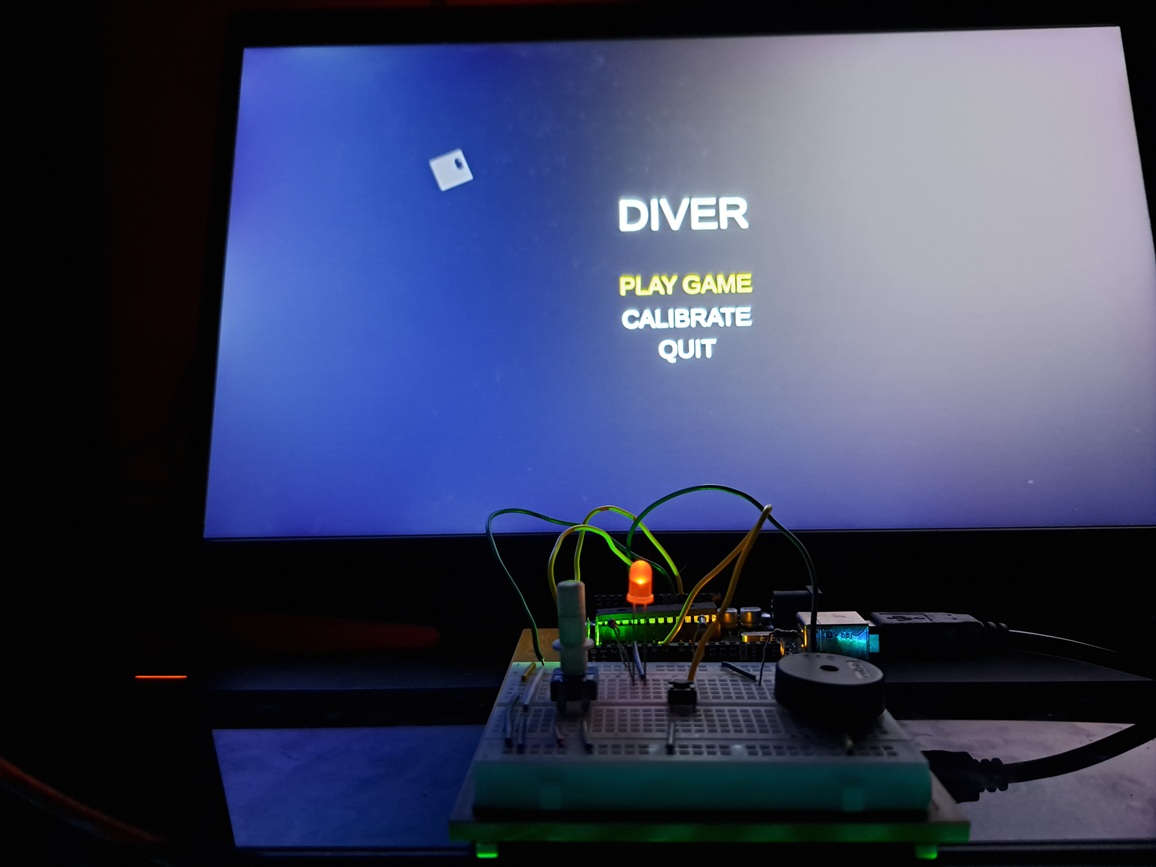
This project was pretty fun to do, and I got to work more with Unity and make an actual game that used an alternative controller that I designed.
The Circuit
The circuit for this was pretty simple, it is just a Piezo, potentiometer, and a button. I ended up designing it this way because I designed the kind of game I wanted to make, and then designed the controller around that idea.
Originally, I hadn’t planned on adding in the LED or the button, but the game needed a way to pause it and I didn’t want to involve needing another device or input to play the game, so I added it in. Additionally, I forgot about adding in Actuators, so I just put in the quickest thing I could, which was an LED. All the LED does is turn on when the game starts, then when the game loop starts it turns off, then when the player dies it turns on again.
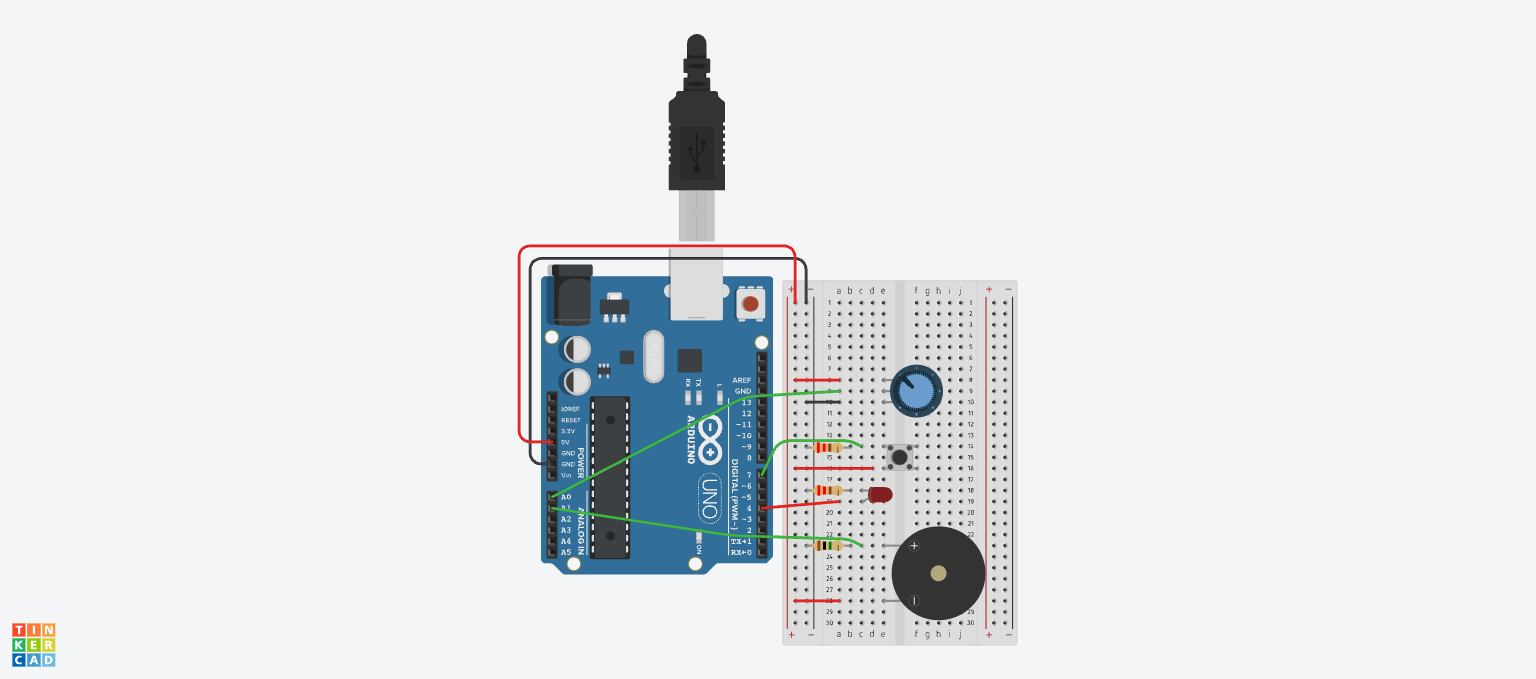
Parts List
| Name | Quantity | Component |
|---|---|---|
| U1 | 1 | Arduino Uno R3 |
| PIEZO1 | 1 | Piezo |
| R1 | 1 | 1 MΩ Resistor |
| Rpot1 | 1 | 250 kΩ Potentiometer |
| S1 | 1 | Pushbutton |
| R2, R3 | 2 | 220 Ω Resistor |
| D1 | 1 | Red LED |
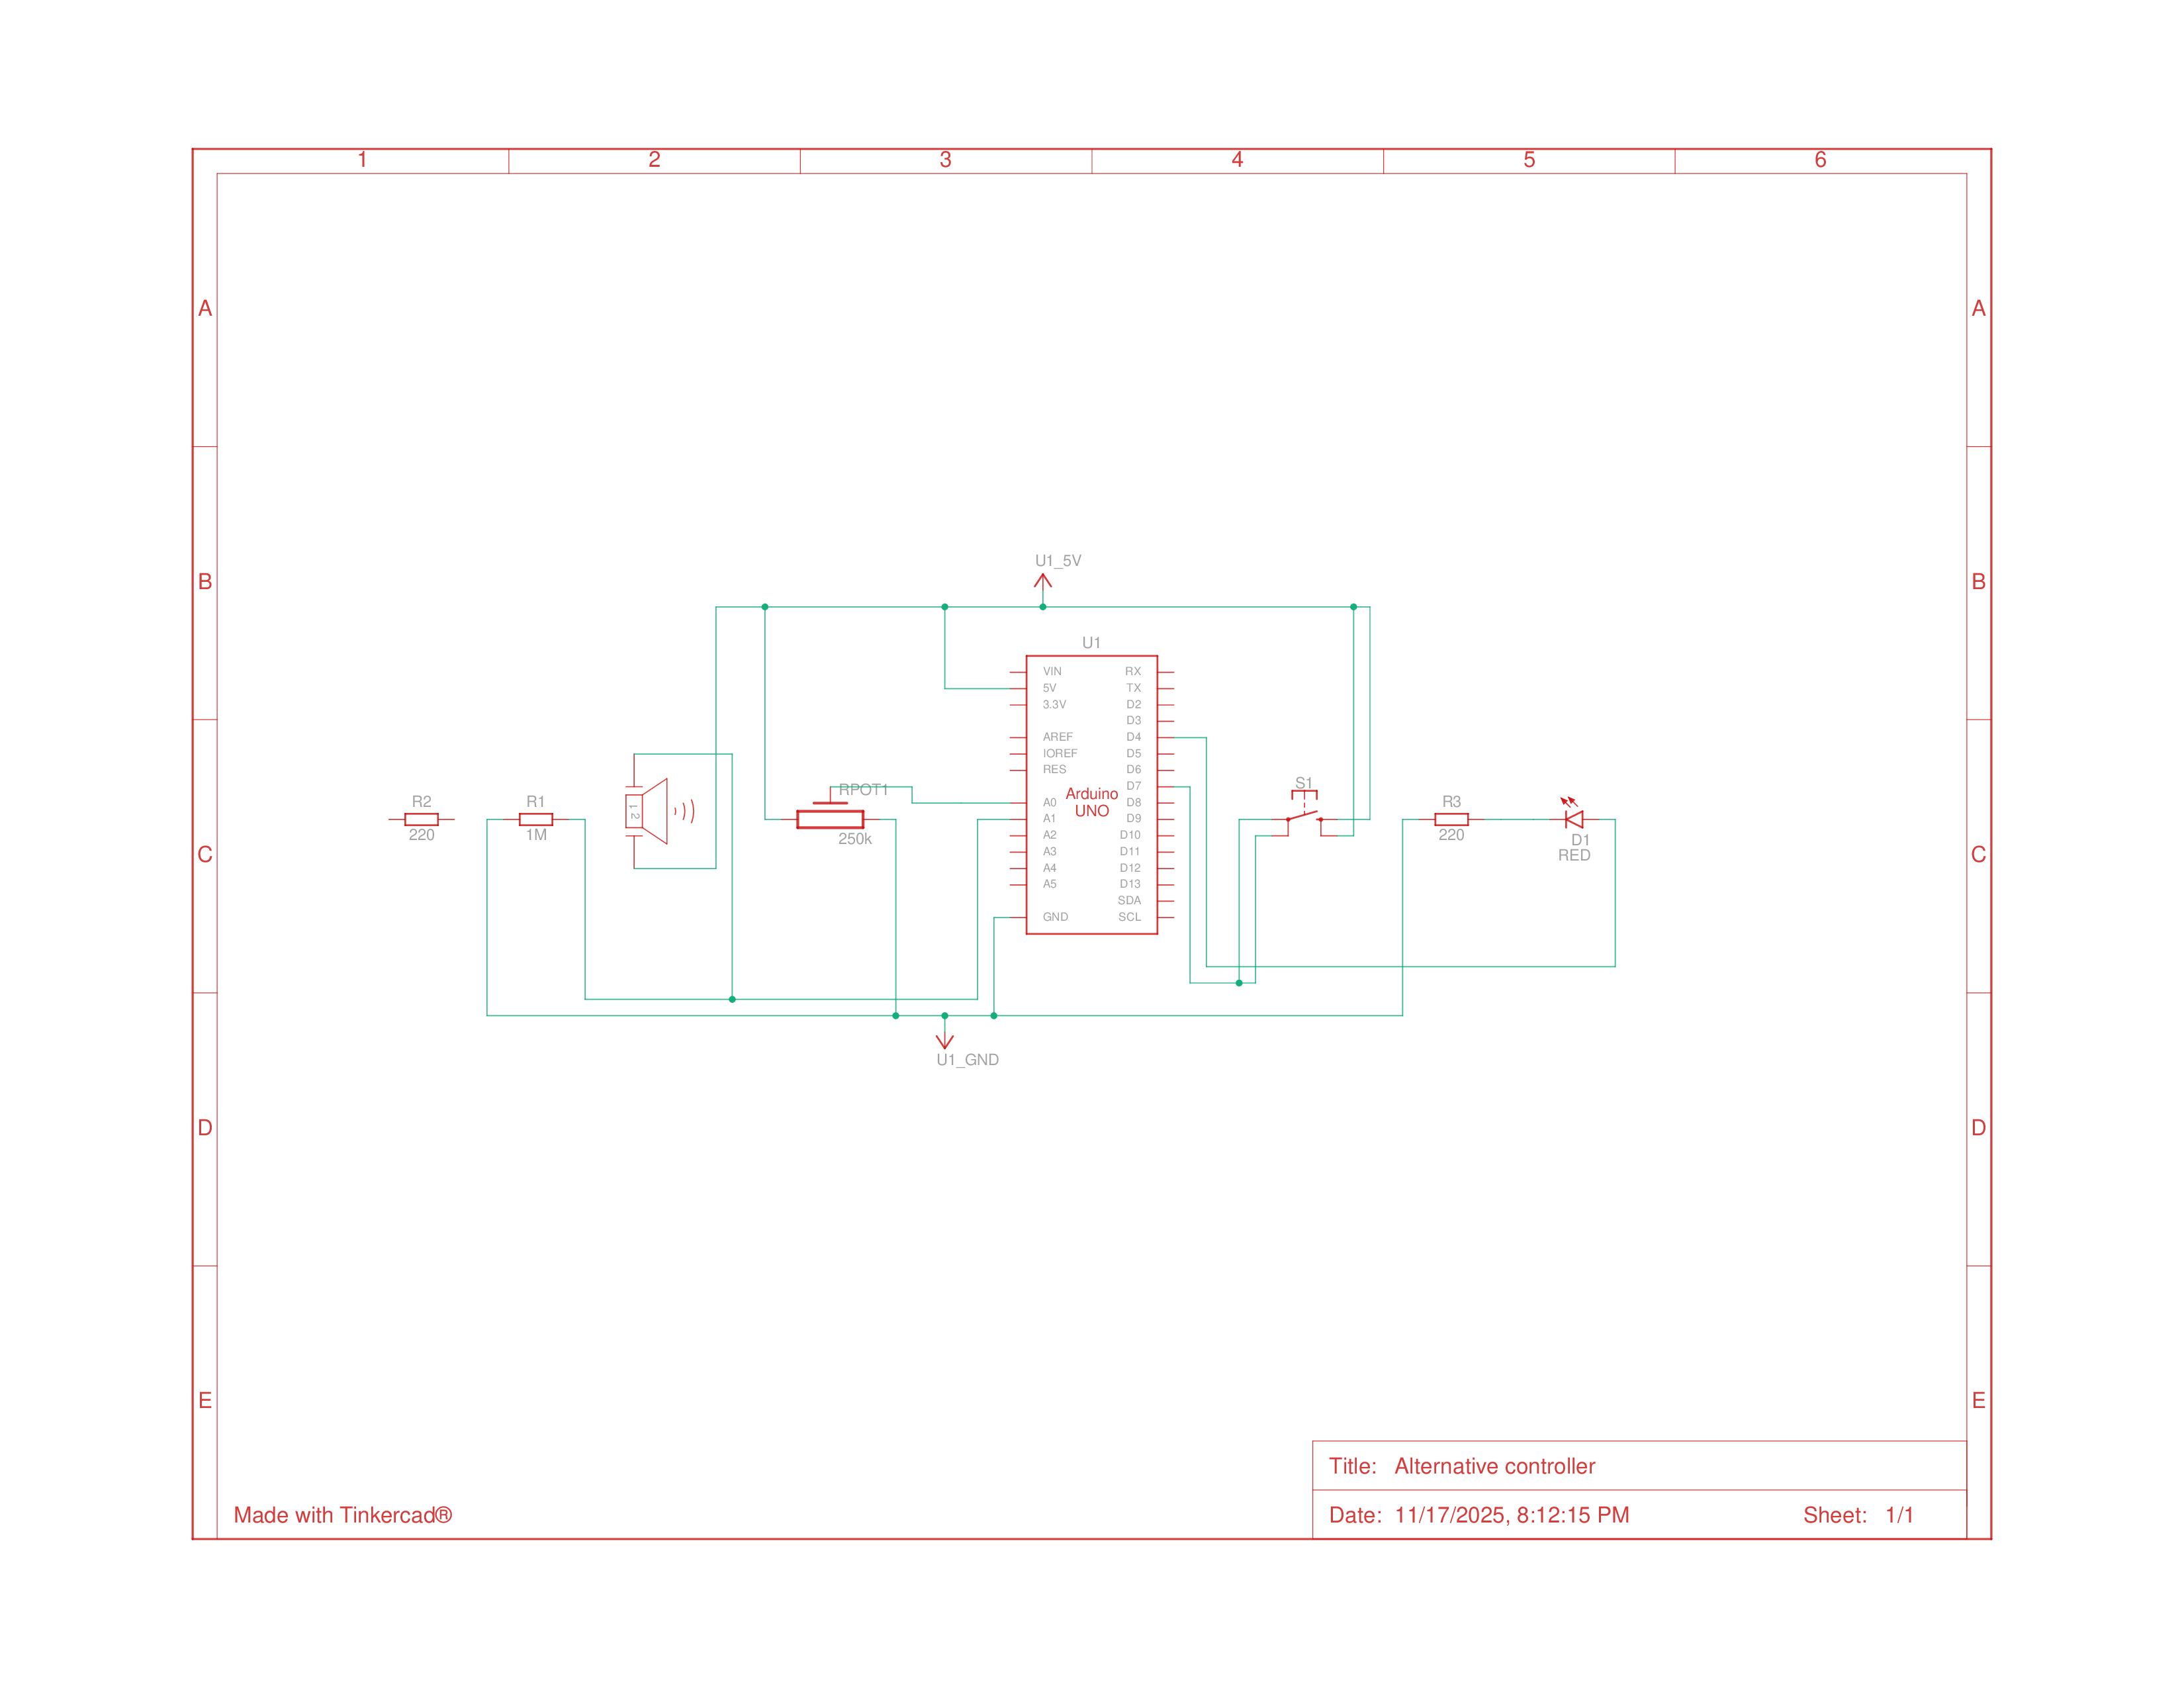
Schematics
Building the Circuit
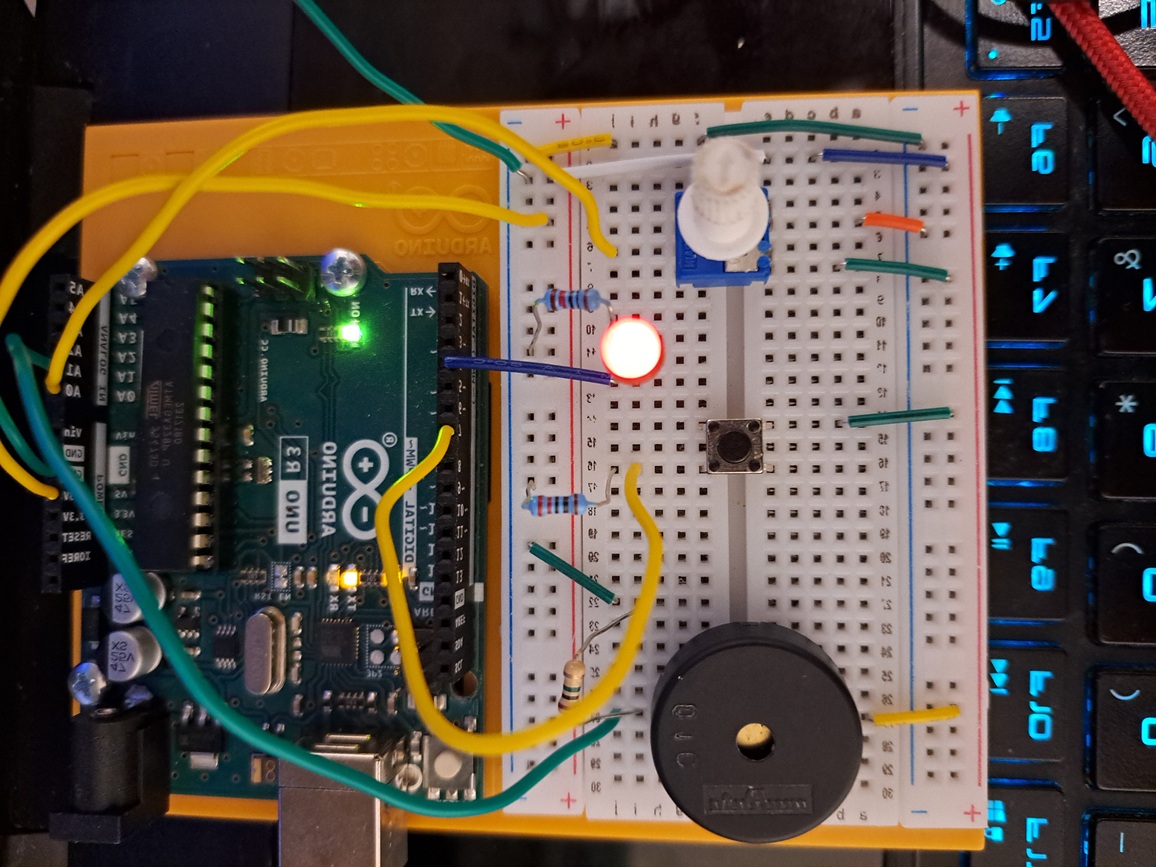
Putting together the circuit was pretty simple, though I did have to make slight modifications to the way I wired things, like moving the Piezo to use both sides of the breadboard, and adding additional smaller wires to bridge the connections instead of just having longer ones across to make using the device as a controller more ergonomic, other than that, it is the same as the schematic I created. This is the final result:
Programming the Arduino
After constructing the circuit, I wrote the code for the Arduino. All the Arduino needed to do for this project was to communicate its data to the SerialPort so that I could have full control over how to interpret it in Unity, and the LED output just needs to read a 0 or 1 when available.
Code
1
2
3
4
5
6
7
8
9
10
11
12
13
14
15
16
17
18
19
20
21
22
23
24
25
26
27
28
29
30
31
32
33
34
35
36
37
38
39
40
const int potPin = A0;
const int piezoPin = A1;
const int buttonPin = 7;
const int ledPin = 4;

int potData = -1;
int piezoData = -1;
int buttonState = -1;

void setup() {
  // initialize serial communication
  Serial.begin(9600);
  pinMode(buttonPin, INPUT);
  pinMode(ledPin, OUTPUT);
}

// data processing wll be done by Unity
// just bus raw values to serial port as soon as possible
void loop() {
  // read data
  potData = analogRead(potPin);
  piezoData = analogRead(piezoPin);
  buttonState = digitalRead(buttonPin);

  // basic csv format since it's only 3 values
  Serial.print(potData);
  Serial.print(",");
  Serial.print(piezoData);
  Serial.print(",");
  Serial.print(buttonState);
  Serial.println();

  if(Serial.available()){
    int data = Serial.read();

    // turn on/off LED depending on what Unity says
    if(data == '1') digitalWrite(ledPin, HIGH);
    else digitalWrite(ledPin, LOW);
  }
}
Programming the Game
After I finished programming the Arduino, it was time to make the game in Unity. This didn’t go as well as I expected it to, since I started over-scoping and trying to add in all sorts of features, most of which I had to cut since there just wasn’t enough time with all the work from other classes.
Challenges
Aside from over-scoping, the main issues I ran into are as follows:
I forgot to change the build profile to .Net Framework, so trying to use Ports caused compile errors. (To fix it just go to Edit > Project Settings > BuildProfiles > Player Settings > Other Settings > Configuration > API Compatibility Level > .NET Framework )
Time management, since for whatever reason, all my other classes had projects and deadlines specifically during these 2 weeks.
For some reason, when I was making test builds for the project, there was lots of lag between Arduino input and the game even though it ran completely fine in the Unity Editor. I have no idea what caused it, nor do I know what fixed it, it just started working properly after some point.
Code
The game repo and the rest of the code can be found here: https://github.com/SamayRShah/Diver
Since there’s lots of code that went into making this game, I won’t go over everything, but I will be explaining the more relevant Arduino related things below:
Communicating with the Arduino is done through a Singleton that opens the connection, reads values every frame, and writes values back to the port, and holds public accessors to the data. Reading data is also done on a separate thread that runs in the background, so that it isn’t blocking anything in the main thread and introducing lag. *This could also be done through Unity’s co-routines, or by registering the Arduino controller as a custom device input and using Unity’s input actions, though, making the input device is a little complicated and requires lots of extra work that wouldn’t be necessary for a game as small as Diver.
1
2
3
4
5
6
7
8
9
10
11
12
13
14
15
16
17
18
19
20
21
22
23
24
25
26
27
28
29
30
31
32
33
34
35
36
37
38
39
40
41
42
43
44
45
46
47
48
49
50
51
52
53
54
55
56
57
58
59
60
61
62
63
64
65
66
67
68
69
70
71
72
73
74
75
76
    private void OpenStream()
    {
        // open communication with Arduino
        _running = true;
        _dataStream = new SerialPort(_serialPort, _baud);
        _dataStream.Open();

        // Start reading serial data on a background thread
        _readThread = new Thread(ReadSerial);
        _readThread.Start();
    }

    private void SerialUpdate()
    {
        // read latest values from Arduino
        string receivedString;
        lock (_dataLock)
        {
            receivedString = _latestData;
        }

        // process data
        ProcessData(receivedString);

        // write data back
        if (_shouldWriteData) WriteData();
    }

    void ReadSerial()
    {
        while (_keepReading)
        {
            try
            {
                // read latest data
                string line = _dataStream.ReadLine();
                lock (_dataLock)
                {
                    _latestData = line;
                }
            }
            catch (System.Exception)
            {
                // ignore timeout or disconnection errors
            }
        }
    }

    // writes whatever data class has back to the data stream
    private void WriteData()
    {
        _dataStream.Write(_outData);
        _shouldWriteData = false;
    }

    public void CleanUp()
    {
        // prevent double entry
        if (!_keepReading || !_running) return;
        _keepReading = false;
        _running = false;

        // close reading thread
        if (_readThread != null && _readThread.IsAlive)
        {
            try { _readThread.Join(100); } catch { }
        }

        // close serial port
        if (_dataStream != null && _dataStream.IsOpen)
        {
            try { _dataStream.Close(); } catch { }
        }

        Debug.Log("Serial connection closed safely.");
    }
I also have a way for the user to calibrate their input through a menu, which just captures the highest ‘raw’ vibration value, and sets it as the baseline in the main ArduinoInput singleton.
1
2
3
4
5
6
7
8
9
10
11
12
13
14
15
16
17
18
19
20
21
22
23
24
25
26
27
28
29
    [SerializeField] private TextMeshProUGUI _maxValueText;
    private int _maxValue = 0;

    // Update is called once per frame
    void Update()
    {
        int piezoVal = ArduinoInput.Instance.RawPiezoValue;

        if (piezoVal > _maxValue)
        {
            _maxValueText.text = piezoVal.ToString();
            _maxValue = piezoVal;
        }
    }
    public void OnConfirm()
    {
        ArduinoInput.Instance.CalibratedMaxVibration = _maxValue;
        GameManager.Instance.QuitState();
    }

    public void OnReset()
    {
        _maxValue = 0;
    }

    public void OnCancel()
    {
        GameManager.Instance.QuitState();
    }
Other than that, I also managed to link the Arduino to Unity’s UI navigation, which made it possible to interact with the game solely through the controller.
Basically, I just got the input values from the Arduino singleton and then called Unity’s built in UI events and functions which simulate interacting with UI the normal way.
1
2
3
4
5
6
7
8
9
10
11
12
13
14
15
16
17
18
19
20
21
22
23
24
25
26
27
28
29
30
31
32
33
34
35
36
37
38
39
40
41
42
43
44
45
46
47
48
49
50
51
52
53
54
55
56
57
58
59
60
61
    // difference in input at which to set next item
    [SerializeField] private float _navSpeed = 0.2f;
    [SerializeField] private Button[] _buttons;

    private float _prevRotation = 0;
    private int _currentButtonIndex = 0;

    private void OnEnable()
    {
        ArduinoInput.Instance.ButtonPressed += TriggerSelectedButton;
        SetSelectedButton(_currentButtonIndex);
    }

    private void OnDisable()
    {
        ArduinoInput.Instance.ButtonPressed -= TriggerSelectedButton;
        _currentButtonIndex = 0;
    }

    private void Update()
    {
        // Get difference in rotation to determine selection direction
        float rotation = ArduinoInput.Instance.TwistValue;
        float diff = rotation - _prevRotation;

        if (Mathf.Abs(diff) >= _navSpeed)
        {
            _prevRotation = rotation;

            // +- difference => +- index
            if (diff < 0) _currentButtonIndex--;
            else if (diff > 0) _currentButtonIndex++;

            // loop around
            if (_currentButtonIndex >= _buttons.Length) _currentButtonIndex = 0;
            else if (_currentButtonIndex < 0) _currentButtonIndex = _buttons.Length - 1;

            SetSelectedButton(_currentButtonIndex);
        }
    }

    private void SetSelectedButton(int index)
    {
        // guard against bad input
        if (index >= _buttons.Length) index = 0;

        // de-select other UI objects
        EventSystem.current.SetSelectedGameObject(null);

        // Unity UI select
        _buttons[index].Select();
        EventSystem.current.SetSelectedGameObject(
            _buttons[index].gameObject, new BaseEventData(EventSystem.current));
    }

    // Simulate a button click event for the selected button
    private void TriggerSelectedButton()
    {
        _buttons[_currentButtonIndex].onClick.Invoke();
    }
}